

Do you know what’s annoying? Having a very long code to create MySQL pivot tables. But do you know what’s more annoying? Repeating the process again and again because there’s no PIVOT function in MySQL.
You wish it was as easy as in Excel. But it’s not.
Hey, I get it. You’re busy. And yet, you want the leanest code that is simple. But it doesn’t end there. You also want it to run fast!
So, listen up, busy MySQL developer! Does this seem more like puzzles from another dimension? Well, buckle up and get ready to unleash the MySQL Pivot Table Hero within you!
We’re going to make the code samples as simple as possible. And if you’re really in a hurry, I’ll show you a tool that can pivot data in less time.
So, grab your cape. Let’s dive in and conquer those pivots like there’s no tomorrow!
Creating a Pivot Table in MySQL is Easier Than You Think
In simple terms, making a pivot table means shifting the rows to columns. And summarize the data without repeating information.
To illustrate, let me show you the sample data we’re going to use later. Before that, let’s create the table for this sample data:
| CREATE TABLE korean_food_sales
(id int NOT NULL PRIMARY KEY AUTO_INCREMENT, city varchar(15) NOT NULL, food varchar(50) NOT NULL, sales decimal(15,2) NOT NULL ); |
|---|
Then, let’s put some data:
| INSERT INTO korean_food_sales(
city, food, sales) VALUES (‘Seoul’, ‘Hoeddeok’, 264000), (‘Seoul’, ‘Bulgogi’, 464000), (‘Seoul’, ‘Samgyeopsal’, 1264000), (‘Seoul’, ‘Japchae’, 264000), (‘Seoul’, ‘Kimchi’, 1260000), (‘Seoul’, ‘Ddukbokki’, 264000), (‘Seoul’, ‘Sundubu-jjigae’, 264000), (‘Seoul’, ‘Bibimbap’, 264000), (‘Busan’, ‘Hoeddeok’, 153000), (‘Busan’, ‘Bulgogi’, 153000), (‘Busan’, ‘Samgyeopsal’, 153000), (‘Busan’, ‘Japchae’, 153000), (‘Busan’, ‘Kimchi’, 264000), (‘Busan’, ‘Ddukbokki’, 264000), (‘Busan’, ‘Sundubu-jjigae’, 264000), (‘Busan’, ‘Bibimbap’, 153000), (‘Incheon’, ‘Hoeddeok’, 184000), (‘Incheon’, ‘Bulgogi’, 264000), (‘Incheon’, ‘Samgyeopsal’, 264000), (‘Incheon’, ‘Japchae’, 184000), (‘Incheon’, ‘Kimchi’, 264000), (‘Incheon’, ‘Ddukbokki’, 264000), (‘Incheon’, ‘Sundubu-jjigae’, 184000), (‘Incheon’, ‘Bibimbap’, 264000); |
|---|
Then, let’s make it nicer to the eyes with a result set from a SELECT query:
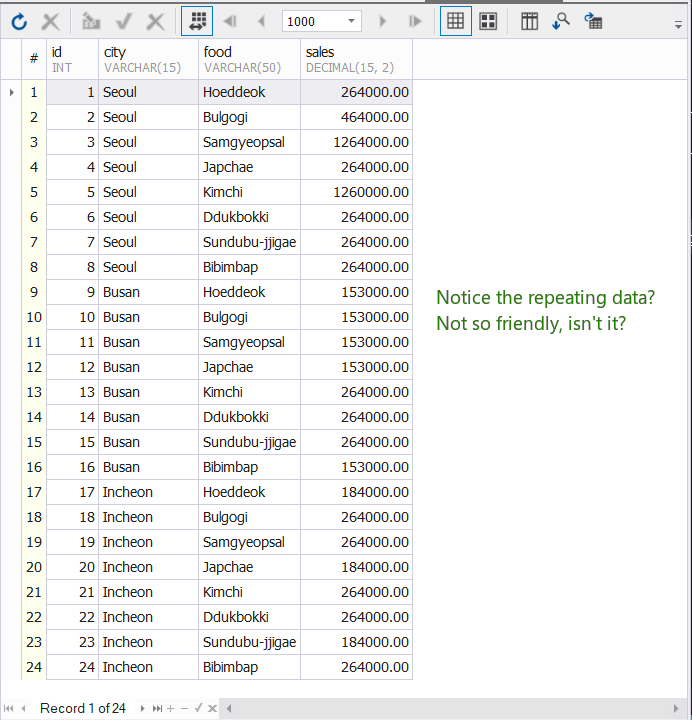
Your user won’t be happy with this presentation of Korean food sales per city. So, here’s an alternative output:
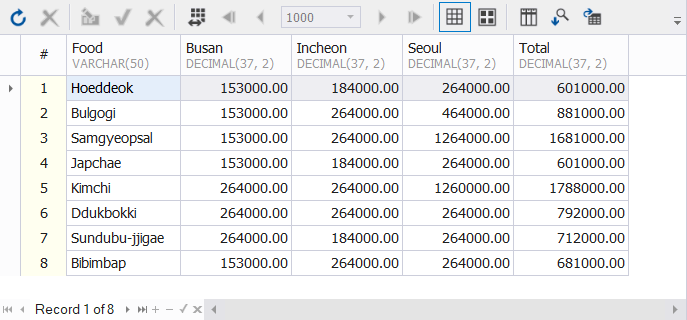
Isn’t this much better? By far! Your user will understand this presentation better.
And guess what? The cities that were part of the rows before are now columns. And there are no more repeating data. This is the pivot table we want to achieve.
So, how are we going to achieve this?
There are 3 steps that you can follow. And we’re going to use IFs, CASEs, and a super MySQL GUI tool: dbForge Studio for MySQL. Note that I’m using MySQL 8.0.33 installed in Ubuntu 22.04.
STEP #1: Know Your Pivot Table Requirements
You can’t pivot what you don’t understand. So, before jumping into coding, do these:
- Ask your user about her desired output. Make sure both of you have the same understanding of the final output.
- Search for the tables you need, including the columns to output and the keys you need to join.
Using these steps in our sample data is easy.
The requirement is: “Give me the Korean Food sales summary per city. The first row is the Korean Food product we have. Followed by columns with city names. Each city column should contain the total sales for that city. The last column is the sum of all sales per food product.”.
Then, the table needed is just 1. And the data is very much summarized for simplicity. I don’t want to distract you with table joins and groupings for now. Just the pivoting part so you can appreciate the concept. We’ll dive into that deeper code later.
So, running a SELECT query gives you the same result as in the very first image earlier. The next part is to choose the weapon to battle this pivot problem. The next part is to choose the weapon to battle this pivot problem.
STEP #2: Choose Your Pivot Table Weapon and Fire
You may think that going to battle means having the most fire power to destroy the enemy. So, in your battle to end a pivot problem, you have 2 options. Code or use a cool tool. Which of the 2 has the most firepower?
There’s no one answer. If there is, we won’t have step #1.
In the following sections, check to see when to use each weapon.
Weapon #1: Code Using IF or CASE in Your SELECT Query
Choosing this weapon is very good at pivoting tables called from an app. A customized system with reporting features is a prime example. But since there’s no direct way to pivot, you can use a SELECT query with IFs or CASE statements. It can be a fixed number of columns. Or a more flexible one using dynamic columns based on data.
Let’s start by using a pivot table with fixed columns.
When You Only Need a Fixed Pivot Table
Here’s an example of using CASE to create a pivot table. Together with the requirements in STEP #1, here’s the code:
| SELECT
Food, SUM(CASE WHEN city = ‘Seoul’ THEN sales ELSE 0 END) AS Seoul, SUM(CASE WHEN city = ‘Busan’ THEN sales ELSE 0 END) AS Busan, SUM(CASE WHEN city = ‘Incheon’ THEN sales ELSE 0 END) AS Incheon, SUM(sales) AS Total FROM korean_food_sales GROUP BY food; |
|---|
The result set is the same as the second image earlier. The Food product is at column one. Then, followed by Korean city names (Seoul, Busan, and Incheon). Each contains total sales in the city. And the final column is Total which contains the total sales for all cities.
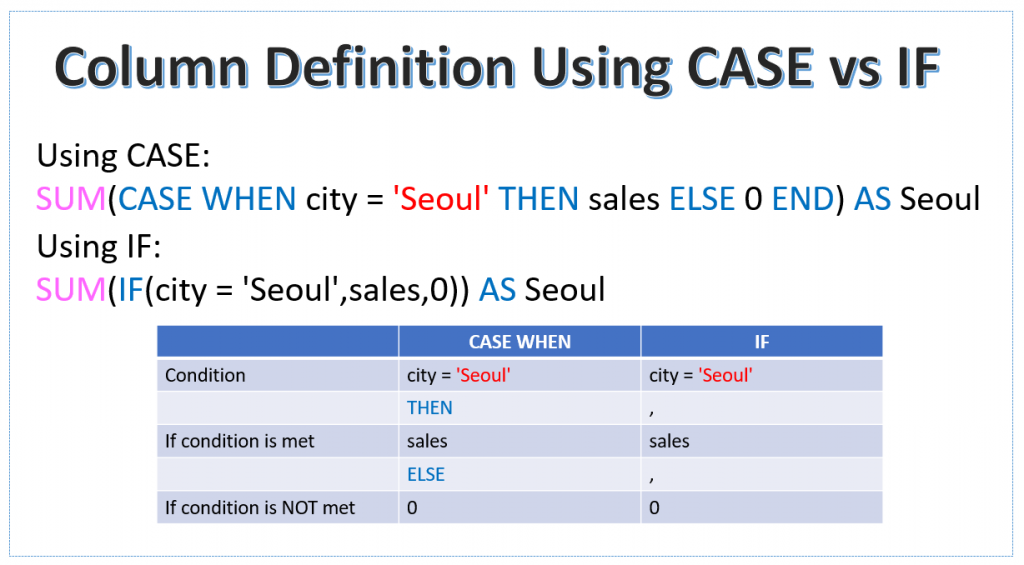
Notice the hard-coded city names in the CASE WHEN condition. Like CASE WHEN city = ‘SEOUL’. This tells MySQL to SUM the sales only if the city name condition holds true in the current row. If the result is NULL, you get zero instead. It repeats a similar logic on other cities.
As an alternative, you can also use the IF function. Here’s what it will look like:
| SELECT
Food, SUM(IF(city = ‘Seoul’,sales,0)) AS Seoul, SUM(IF(city = ‘Busan’, sales,0)) AS Busan, SUM(IF(city = ‘Incheon’,sales,0)) AS Incheon, SUM(sales) AS Total FROM korean_food_sales GROUP BY food; |
|---|
The output is the same whether you use IF or CASE. But using IF lets you type less. See how similar the purpose of each is below:
But the hard coding of values presents potential problems. Though this will work and provide the required output. It is also simpler. But what if you add another city? Or what if you delete an existing city in the table? The coding never ends.
That’s why you need to generate dynamic pivot columns in the SELECT query.
When You Need a Dynamic Pivot Table
The previous example is good if the pivot columns won’t change. But not if data moves.
Here’s a dynamic way to do this using a prepared statement or a generated SELECT statement:
| — Initialize SELECT statement string variable
SET @sql = NULL; — Generate pivot columns SELECT GROUP_CONCAT(DISTINCT CONCAT( ‘SUM(IF(city = ”’, city, ”’, sales, 0)) AS ‘, city ) ) INTO @sql FROM korean_food_sales; — Combine the generated pivot columns to the rest of the SELECT statement SET @sql = CONCAT(‘SELECT Food, ‘, @sql, ‘ ,SUM(sales) as Total FROM korean_food_sales GROUP BY food’); — Prepare and run the generated SELECT statement PREPARE stmt FROM @sql; EXECUTE stmt; DEALLOCATE PREPARE stmt; |
|---|
There’s a lot to digest from this script. But not impossible to understand and do yourself. Let’s describe them one by one in the following details.
Line-by-line Explanation
- The goal is to create a SELECT statement in a string variable. This is where to dynamically add the columns based on data.
- The output string is the same as the SELECT statement using the IF function.
- SELECT @sql = NULL. This initializes the @sql variable. We’re going to put the generated SELECT statement here.
- CONCAT(‘SUM(IF(city = ”’, city, ”’, sales, 0)) AS ‘, city). This will combine 4 string values into one. And this will form the column definition per city. The expected sample output is ‘SUM(IF(city = ‘Seoul’, sales,0)) as Seoul or any of the cities listed in the table. This includes more cities in the future if there will be any. Or remove the ones that no longer exist.
- SELECT GROUP_CONCAT(DISTINCT … ) INTO @sql. The purpose is to put the output string INTO @sql variable. GROUP_CONCAT is an aggregate function. It combines text in table rows into one string based on a group. Meanwhile, the DISTINCT keyword makes sure that duplicates will not occur. This and the previous bullet point form all the pivot columns generated.
- SET @sql = CONCAT(‘SELECT Food,’, @sql, ‘, SUM(sales) as Total FROM korean_food_sales ... This part combines the generated pivot columns to the rest of our SELECT statement.
- PREPARE stmt FROM @sql. This will create a prepared statement named stmt using the value of the @sql variable. The @sql variable contains the generated SELECT statement earlier.
- EXECUTE stmt. Runs the statement contained in the @sql variable.
- DEALLOCATE PREPARE stmt. Removes the prepared statement in memory. This avoids the upper limit set in max_prepared_stmt_count in the server.
Debugging Prepared Statements
dbForge Studio or any other tool will not check the generated SELECT statement. So, problems at runtime may appear out of nowhere. I didn’t get this right the first time too. There were missing commas that caused a runtime error.
So, to fix this problem, use the built-in debugger in dbForge Studio for MySQL. And with this handy tool, you can do a line-by-line execution. Then, see the value of @sql variable before it hits the error.
But if you don’t have a debugger in your tool, try this:
- Edit the script by adding SELECT @sql to where you might expect the problem. This will display the string generated by the script. For example, do you suspect that the pivot columns have a syntax error? Then, add it after the pivot column generation.
- Then, run it to see the value of @sql.
- Fix, the problem and try again.
That’s how you will create pivot tables using code. In summary, here are the points in this first weapon:
- Use this technique when you need to call the pivot table from an app. This applies when you made the app yourself. Or you used something else like Excel.
- You can choose between fixed columns or dynamic columns.
- Fixed columns are easier to do but not flexible for new, updated, and deleted data.
- Meanwhile, dynamic columns are flexible but a bit harder to code.
Weapon #2: Use dbForge Studio for MySQL to Create Pivot Tables
All the hard stuff in weapon #1 is exponentially simplified using the Pivot Table tool. This is a feature in dbForge Studio for MySQL. You can use this tool to make pivot tables in record time. Think of a few seconds for our easy example earlier. And to top it all, you can even make graphs out of the pivot table in a few clicks.
Now, why did we discuss coding in the first place if there’s a magic tool like this?
Because each weapon has its purpose. The first weapon is good for combining it with apps. But this one is good when you’re in a pinch. Think of it like your user needs the pivot table so badly since yesterday (but he told you about it today!). In short, it’s very, very urgent. And you have -1000 seconds left to finish it. You have no time to code!
More importantly, you can use this for quick analysis of the data. You don’t need to code to analyze it when there’s an easier way.
Here are the very, very easy steps:
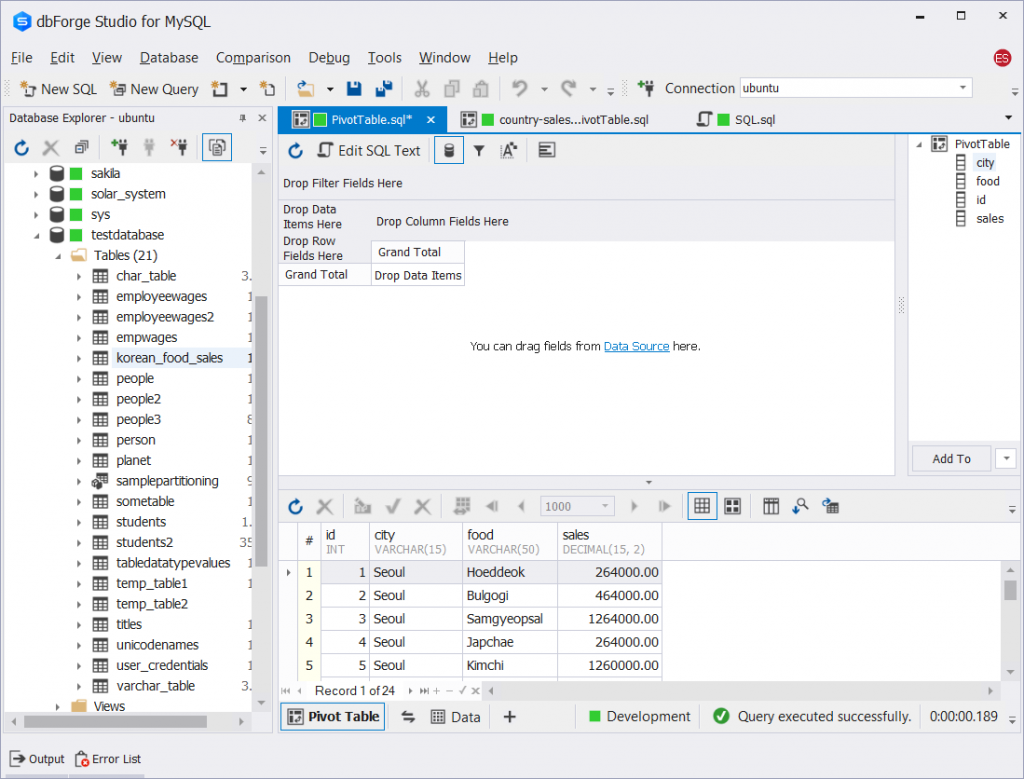
- In dbForge Studio, click Database -> Pivot Table. Then, you will see a blank pivot table.

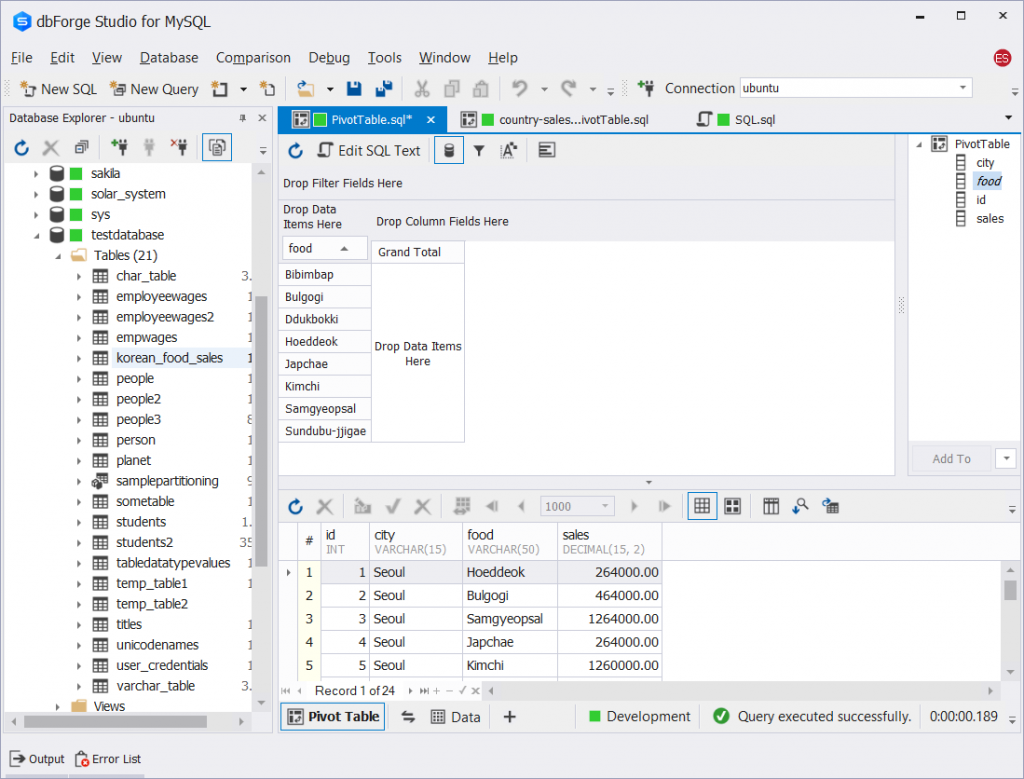
- Drag the table you need to pivot from the Database Explorer. Following our example, drag korean_food_sales table to the canvas. Or paste the SQL statement in the code area for complex scenarios. See a sample below.
- From the Data Source pane, drag the columns you need to be rows, columns, or values. You’ll feel right at home if you did pivot tables in Excel before. Following our example, drag the food column to the Rows Area. Then, drag the city column to the Columns Area. And finally, drag the sales column to the Data Area.
That’s it!
MySQL Pivot Table Output Using dbForge Studio for MySQL
See the output below after dragging the food column to the Rows Area.
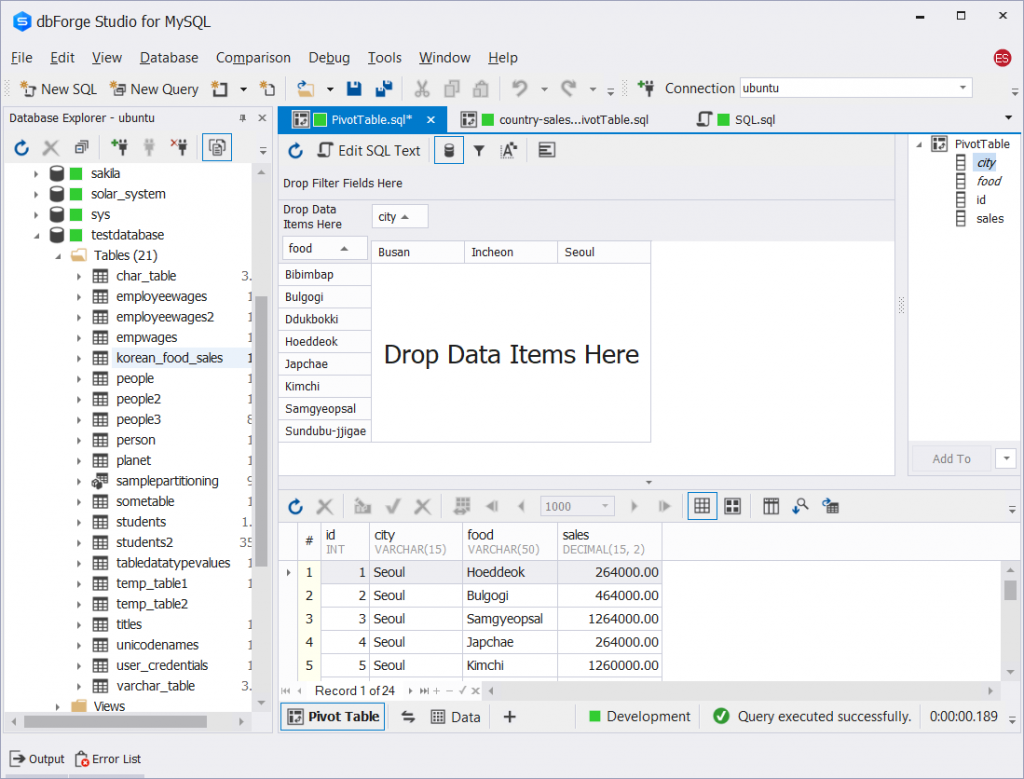
Then, see the output after dragging the city column to the Columns Area.
And finally, here’s what happened after dragging the sales column to the Data Area.
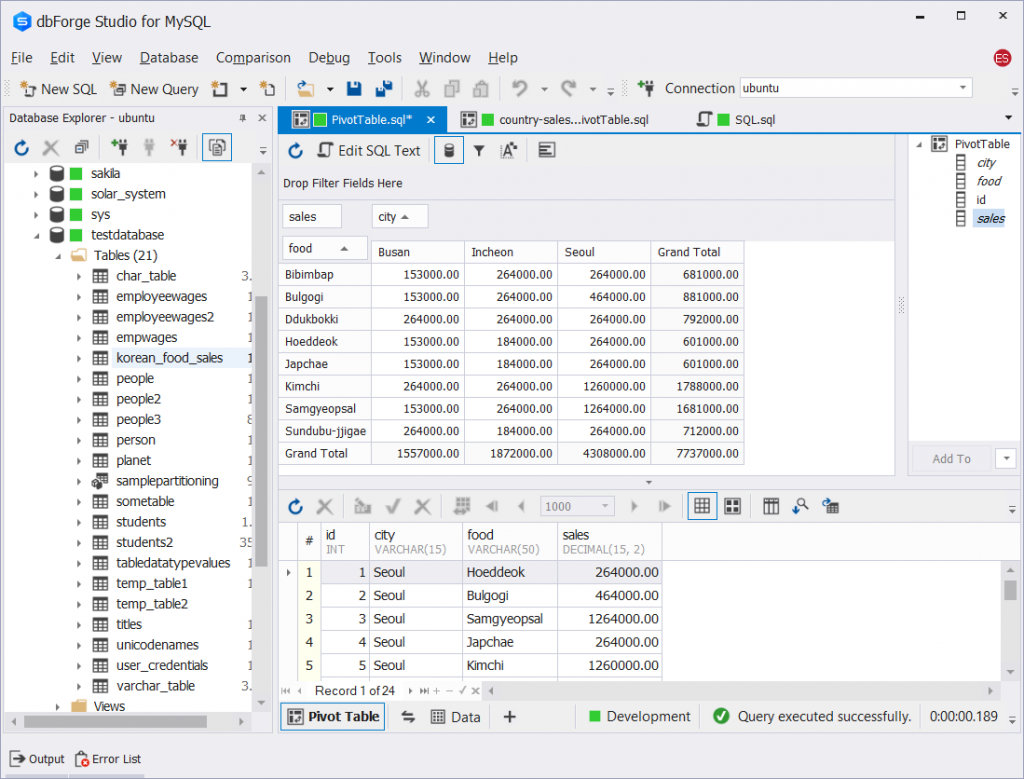
That’s it! Everything went well using drag-and-drop.
Now, here’s a bonus: a graph out of the pivot table:
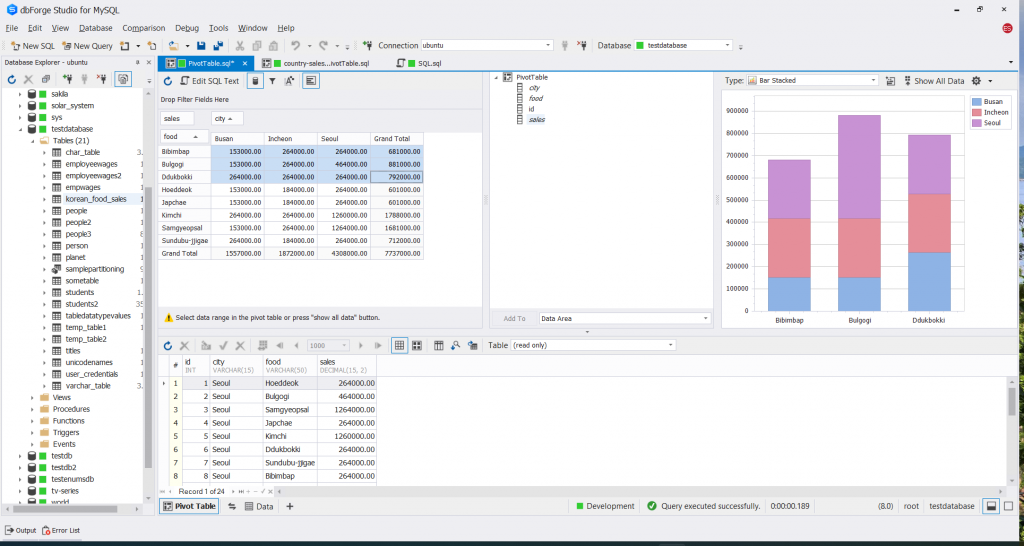
In summary, you can use a brilliant tool to make a pivot table out of a SELECT statement. dbForge Studio for MySQL is such a tool. Use drag-and-drop and finish the pivot table in a very short time. And do a quick analysis of your data. But remember that you can’t call this report from an external app.
STEP #3: Tune Your MySQL Pivot Table Query
Most of us overlook this step. And if that’s the case, your pivot table code may perform poorly. That’s not a pivot table hero moment if you ask me. So, what can you do?
Using dbForge Studio to tune your queries is a great idea. Because it has a Query Profiler that lets you see execution plans, session stats, and more. And you can even compare them to previous runs after you made some adjustments to the table.
You will notice it at first when you run your pivot table code. If it’s slow, something is slowing it down for sure. Like a truck full of loads, you have to unload some items to make it run faster.
And the Query Profiler will give you information on what’s slowing it down. Most of the time, the SELECT statement is too complex. Or there’s a missing table index. Or the database design is not so good.
Let’s try this example and see if it performs well. We’ll use the Sakila sample database for this purpose. And we’re going to get the country rental payments for May to August 2005. Here’s the code:
| SELECT
c2.country ,SUM(IF(MONTHNAME(p.payment_date) = ‘May’,p.amount,0)) AS May ,SUM(IF(MONTHNAME(p.payment_date) = ‘June’,p.amount,0)) AS June ,SUM(IF(MONTHNAME(p.payment_date) = ‘July’,p.amount,0)) AS July ,SUM(IF(MONTHNAME(p.payment_date) = ‘August’,p.amount,0)) AS August ,SUM(p.amount) AS total FROM payment p INNER JOIN customer c ON p.customer_id = c.customer_id INNER JOIN address a ON c.address_id = a.address_id INNER JOIN city c1 ON a.city_id = c1.city_id INNER JOIN country c2 ON c1.country_id = c2.country_id WHERE p.payment_date BETWEEN ‘2005-05-01’ AND ‘2005-08-31’ GROUP BY c2.country; |
|---|
Note that we’re using a fixed-column pivot table here for simplicity. If you want to check the performance of a dynamic one, capture the final SELECT statement. And use it for the query profile.
To begin, click the Query Profiling Mode button from the toolbar. Then, run the query above.
The Query Profiler Results
Then, check the Query Profile below and see how long it ran:
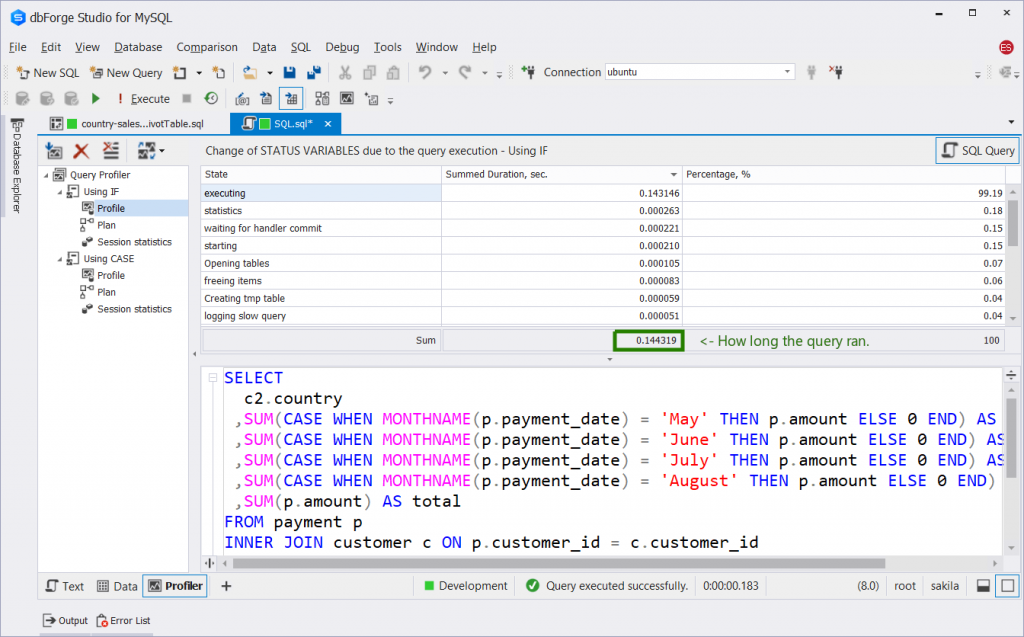
Based on the image above, it took 0.14 seconds to finish running the query. If this ran for more than a second, there’s something wrong. And we need to investigate further.
Let’s check the query plan if MySQL utilized the table indexes:
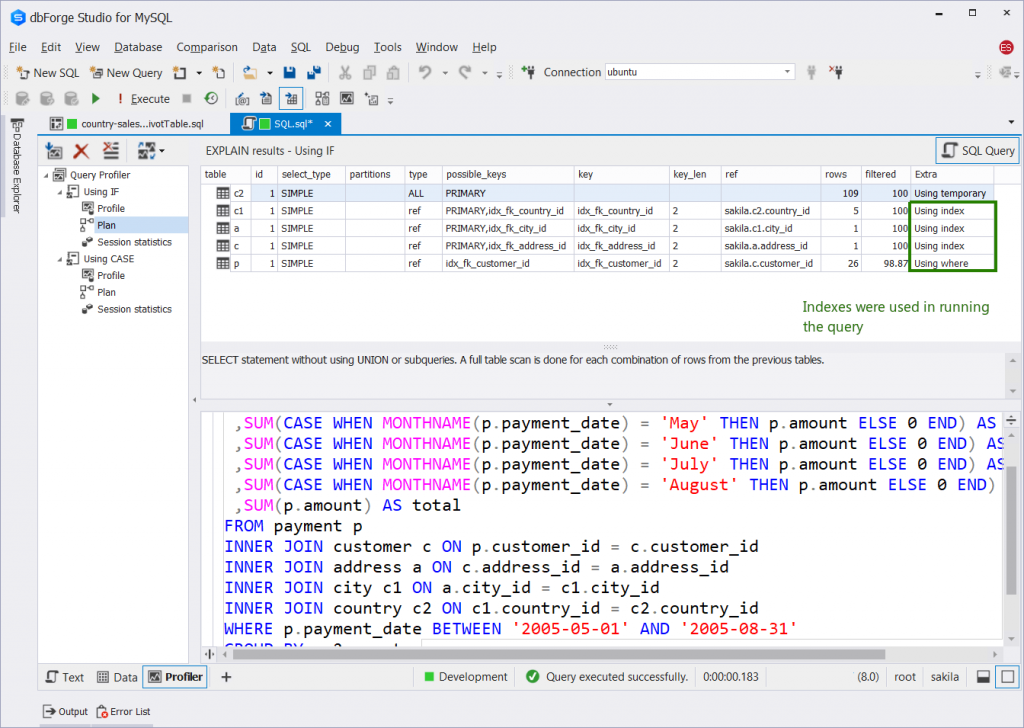
Looks like we really have nothing to fix. MySQL used the table indexes to run our query. If you see ALL appearing in the type column with a blank Extra column, it means MySQL didn’t use any index. If there’s no index in the table, create one using the columns in the join, WHERE, and GROUP BY.
Note that using a CASE instead of IF doesn’t change the query plan. And the session stats and query profile are almost the same.
Are You Ready to Take the MySQL Pivot Table Challenge?
You may not master this today, as I did. But through practice, it will be like second nature to you. You may forget too but you can always come back to this post.
Remember the 3 steps: Know your requirements, choose your pivot table weapon, and tune your pivot table query. If you choose to code (weapon #1), go the flexible route with dynamic pivot columns. But do not forget how to create a fixed one. You will use a fixed query for debugging and query performance tuning.
In any case, you can always use a good pivot table hero tool like dbForge Studio for MySQL (weapon #2). Try its power in creating pivot tables by downloading it today. And see more features like its amazing coding assistance. And my personal favorite: the Query Profiler to make your queries run fast.
Follow Technoroll for more!


